Thursday 12 November 2015

We've moved!

Hello everyone!

We are very excited to let you know that we have now launched our brand new website! This means the blog has moved too, so to view all our latest posts please click here!


Enjoy and happy making!


Tuesday 10 November 2015

Poinsettias & Stars on a Winter Lay-out

Hi Sizzix fans!
Are you looking forward to the winter season or do you miss the summer sunshine already? I definitely prefer summer and am not a big fan of the cold and dark winter days. But there's one thing I do love about winter: the magical snow landscapes that make great pictures. 
Today I would like to show you a Sizzix lay-out I made with one of the snow pictures that I took last year. I used a bunch of beautiful Sizzix dies on my project, inluding the gorgeous Bigz die Tattered Poinsettia and the wonderful Framelits Stars set. 


Sizzix supplies:
Bigz Die Postage Stamp Frame

I matted the photo on a postage stamp frame, which I cut out with the Bigz Die Postage Stamp Frame. I then created a large poinsettia flower in the corner of my photo. I therefore cut out four poinsettias with the Bigz Die Tattered Poinsettia, inked the edges and stapled them on top of each other. 


Alongside the edges of my lay-out, I incorporated two honeycomb patterns, which I cut out with the Frameworks Die Honeycomb. This die is simply perfect for creating nice patterns on your background. I also cut out both large and small stars with the  Framelits Die Set Stars to use in the corners of my lay-out. I adhered small poinsettias on top of the two large stars as well. 


I just love how well the different Sizzix Christmas die match each other and had lots of fun using them on my lay-out. 
I hope you enjoyed my blogpost.
Let's hope there will be some snow again this winter, so we can scrap those nice photos again :)

Happy crafting!

In Dutch:
Hi Sizzix fans!
Zien jullie al uit naar de winter of missen jullie de zomer juist? Ik ben absoluut een zomermens en ben niet bepaald fan van de koude en donkere winterdagen. Maar er is één ding dat ik wel leuk vind aan de winter: de magische sneeuwlandschappen en de mooie foto's die je daarvan kunt maken. 
Vandaag wil ik graag een Sizzix lay-out laten zien waarop ik één van mijn sneeuwfoto's van vorig jaar heb verwerkt. Ik heb daarvoor verschillende Sizzix stansen gebruikt, waaronder de mooie Bigz die Tattered Poinsettia en de gave Framelits Stars set. 

Sizzix stansen:
Bigz Die Postage Stamp Frame

Ik heb de foto gemat op een postzegelvorm, die is uigestanst met de Bigz Die Postage Stamp Frame. Daarna heb ik een grote bloem gemaakt in de hoek van de foto door vier bloemen uit te stansen met de Bigz Die Tattered Poinsettia, Ik heb de blaadjes van de bloemen beïnkt en de bloemen vervolgens op elkaar geplakt. 

Langs de randen van mijn lay-out heb ik twee honingraatpatronen verwewrkt, die ik heb uitgestanst met de Frameworks Die Honeycomb. Dit is zo'n leuke stans  om mooie achtergrondpatroontjes mee te maken. Verder heb ik een aantal kleine en grote sterren uitgesneden met de Framelits Die Set Stars om in de hoeken van mijn lay-out te gebruiken. Op de grote sterren heb ik ook twee kleine uitgestanste bloemetjes geplakt. 

Ik vond het zelf erg leuk om te zien hoe goed de verschillende kerstmallen van Sizzix bij elkaar passen en heb ze met veel plezier gebruikt.
Ik hoop dat jullie mijn blogpost ook leuk vonden.
Laten we hopen dat er dit jaar weer sneeuw valt, zodat we genoeg foto's hebben om te scrappen :)

Veel knutselplezier!

Monday 9 November 2015

One die a few ways of using the envelope


Last time I was here, I showed how to make a card using the actual envelpe die. Today I am still using the same die to create cards, but slightly different this time.


For this project you will need:

Sizzix Big Shot Plus Machine Only - 660020 (for the envelope you need the larger 9" width of the Plus)

Card, Stamp, tag and adhesives


I took a prescored card that was 5 x 5 inches square when folded in half.
I placed the square die in place and secure it with low tack tape.


Because the die is almost exactly 5" you can use your standard Sizzix Big Shot to die cut this die, but for the envelope die you will need the Big Shot Plus.


Because of the amount of detail, before lifting the die I always turn it around to make sure that I have cut it through. Usually with 2 passes it is perfectly cut, but it will depend on the card.


Gently I removed all the excess bits. Because they are rather large, I didn't use the die brush.


I cut a square piece of hot pink card and attached it to the back.

Finally, I stamped the message in a white tag and added a brad trough.


I used my Big shot plus to die cut a matching square envelope.


And this is another version which I think would be nice for a wedding, two halves!

I hope you like it and try to use your dies to be creative!


Saturday 7 November 2015

Delicate Fall


Hi there,
today I start with my first christmas projects and my choice was this wonderful

The really best result with these filigree dies you get with


I like this filigran snowflakes so much!


I hope you enjoy and wish you a lovely weekend!
Annika


Wednesday 4 November 2015

Do you want to build a snowman?


If you have a child or grandchild of a certain age you will immediately recognise the title of this blog as the title of a song from the movie Frozen which to which I know all the words which have seeped in through osmosis over time.

I realised that it has been some time since I made any cards with my beloved Framelits circle dies which are always popular whenever I take them to a demonstration or workshop because it shows what can be achieved using the simplest shape and a sprinkling of imaginative fairy dust!

Most of these cards feature complete circles but below is a diagram which shows how to unlock the creative potential of circle dies by simply placing the die back onto a die-cut circle to create two separate shapes namely a crescent and leaf. By clever positioning the die you can create thin or fat leaves and crescents depending on what you need for any particular project.


Let's get on to the fun stuff! I have combined two sets of Framelits circles to give me a little more choice, the only other die used in this project is a is a snowflake from the fabulous Thinlits Paper Snowflakes Set by Tim Holtz. I started by die-cutting two white circles and a brown snowflake.


 Next, I stamped a sentiment onto a strip of cream card before tearing along both edges. I am using a stamp set from my stash and I haven't got a clue where it comes from, believe me, I've trawled the Internet to try and find it but the good news is that there are many similar options available!

After adding the stamped strip to the top of my kraft base card I attached the larger circle in the bottom right hand corner before trimming away the over hang with a craft knife. Next I added the smaller circle using adhesive foam pads before adding a triangle of orange card cut with a pair of scissors. Can you see where this is going?


 I used my scissors to cut a couple of asymmetric strips of red spotty card (Double Dot by BoBunny) before snipping into the ends to represent the tassells on a scarf. 

Remember our die-cut snowflake? I cut away two pieces to represent the snowman's arms before gently curling both halves of the scarf to add a little dimension.


 Here is the finished card complete with a few black adhesive pearl gems strategically placed to create the eyes,mouth and buttons. Really simple but great fun!


I have been using the Framelits Holiday Knit die set quite a bit lately and today I am using it to create a stencil. I then die-cut a blue circle before cropping it using a larger Framelits circle die. I cut a couple of asymmetric rectangles of the same blue card for 'sleeves' before applying white gesso through my home made stencil using a sponge applicator.


I die-cut a white circle for the head before adding the nose and eyes as before and I used my scissors to cut a tiny tag, accuracy isn't important for this! I punched a hole in the tag, threaded it with twine and attached a red die-cut heart.


This is the final card. The background was decorated with white gesso applied through the Tim Holtz Speckles stencil and  I added the stamped sentiment near the top before assembling my snowman using the 'Snowflake' hands.


For the next card I started by die-cutting two circles to make the head and body of the snowman. To create the mouth I used the technique outlined at the start of the post. The result is this small brown crescent.


 I attached the snowman to the bottom of my base card (there is a blue strip added in the final card OOPS!) and cut a strip of blue spotty card to make the scarf. I used my tweezers to add folds to the scarf before applying under the snowman's chin.

For the sentiment I used this alphabet stamp set (Hobbycraft if I remember!) stamping onto Kraft card.


You can see where I added the blue strip before mounting the snowman. I trimmed the words to size before attaching to the base card using adhesive foam pads.

The finishing touch is the white die-cut snowflake taken from one of my all-time favourite Decorative Strip dies namely Winter Elements by my good buddy, and fellow Christmas baby Paula Pascual.


Last but not least I die-cut three different white circles and a pair of snowflake arms before assembling my snowman. I then cut a length of thin twine and curled both ends by wrapping them around my tweezers.


I added the twine to the snowman with a glue gun before die-cutting a selection of tiny stars using a Christmas Stocking die from Debi Potter's Festive Paper Arts Range. To create the mouth I made a die-cut crescent and cut away a small rectangle which when added to the die-cut snowman looks like a lone tooth!


Here is the finished card with the stars added to the twine forming a festive garland. The background is simply two stamps creating a pattern by stamping repeatedly with pale colours.


I had so much fun making these cards and if you like them I may make a few more for next weeks blog. Sadly I ran out of time before running out of ideas, I wish every day could be like that!


Christmas in a cup


Hi everybody!

I think it's soon (that's the truth), but is November already and we are in Christmas Time launching!

With a  nice white porcelain cup and a Fuji Instax photo, I want to create a little crazy, but beautiful, christmas home decor.


And here you have it! Christmas in a cup.


Let's see some gorgeous details of my first christmas project for 2015 (others will come, for sure!)


This are the Sizzix products used in this project:

Be happy!!

----------------------

Hola a todo el mundo!

Creo que es muy pronto (esa es la verdad), pero es noviembre ya y estamos en el lanzamiento del momento Navidad!

Con una taza de porcelana blanca chula y una foto Fuji Instax, he querido crear una bonita decoración navideña, un poco loca.

Y arriba lo tienes! La Navidad en una taza.

También puedes ver algunos detalles magníficos de mi primer proyecto navideño para 2015 (y vendrán otros, seguro!)

Estos son los productos Sizzix utilizados en este proyecto: 

Seed muy felices!!

Tuesday 3 November 2015

Fall Tree or Christmas Tree?

Hi Sizzix fans!

Have you seen the beautiful Bigz Die Evergreen already? It's one of my favourite dies, especially because it is very versatile and can be used in many different ways.
Today I will show you how you can use this tree either on a fall card or on a Christmas card. 

My first card is a typical fall card featuring warm colours and many cut out leaves.


Sizzix products (for both cards):
Tim Holtz Postage Stamp Frame Die


The basis of this card was made with the Tim Holtz Postage Stamp Frame Die. I then cut out the tree from wood patterned paper with the Bigz Die Evergreen and heavily inked the edges to make it stand out more. The sentiment in the center of my card consists of a chipboard piece and a ticket, which I cut out with the smallest die from the Framelits Die Set Tickets. I further decorated my card with several leaves cut out with the Thinlits Die Set Floral Wreath to give my card an autumn feel.


On my second card I used the same die to create a Christmas tree instead of a fall tree. By using a different combination of colours and stars instead of leaves, I managed to create a very different look while using the same tree die. 


The basis of this card is the same as for the previous card. I only used the circle die from the Thinlits Die Set Festive Scribbles for the central element on my card and I decorated my card with tiny stars instead of leaves. The stars are all cut out with the smallest die from the Framelits Die Set Stars.


I hope you are as excited about this die as I am and that I could inspire you with my cards.
Thank you very much for stopping by on the Sizzix blog today!

In Dutch:
Hoi Sizzix fans!

Hebben jullie de mooie Bigz Die Evergreen al gezien? Het is één van mijn favoriete stansen van Sizzix, vooral omdat hij zo veelzijdig is en zich voor allerlei soorten kaarten goed leent. 
Vandaag laat ik dan ook zien hoe je deze stans zowel op een herfstkaart als op een kerstkaart kunt verwerken. 

Mijn eerste kaart is een typisch herfstkaartje met warme kleuren en veel uitgestanste blaadjes.

Sizzix producten (voor beide kaarten):
Tim Holtz Postage Stamp Frame Die

De basis van mijn kaart is gemaakt met de Tim Holtz Postage Stamp Frame Die. Daarna heb ik uit papier met een houtpatroontje met de Bigz Die Evergreen een boom gestanst en de blaadjes daarvan bewerkt met inkt. In het midden van de kaart heb ik een aantal embellishments verwerkt en ook een ticket, dat ik heb uitgestanst met de kleinste stans uit de Framelits Die Set Tickets. Ik heb mijn kaart verder versierd met blaadjes, uitgestanst met de Thinlits Die Set Floral Wreath voor een herfstachtige uitstraling.

Op mijn tweede kaart heb ik dezelfde stans gebruikt om een kerstboom in plaats van een herfstboom te maken. Door een andere kleurencombinatie te gebruiken en sterren in plaats van blaadjes kon ik met dezelfde stans een heel andere uitstraling creëren. 

De basis van deze kaart is eigenlijk identiek aan die van de vorige kaart. Ik heb alleen dit keer de cirkel stans uit de Thinlits Die Set Festive Scribbles gebruikt voor het centrale element op mijn kaart en heb sterren in plaats van blaadjes gebruikt. De sterren zijn allemaal uitgestanst met de kleinste mal uit de Framelits Die Set Stars.

Ik hoop dat jullie net zo enthousiast zijn over deze stans als ik en dat ik jullie een beetje heb kunnen inspireren met mijn kaartjes.
Bedankt voor je bezoekje aan het Sizzix blog!

How to make a stencil with the Big Shot


 Hi friends!

Usually we use our Big Shot to cut all kinds of objects and decorations, and We also saw how to make foam stamps, but ... you can use our dies to make a stencil? The answer is yes! With a little trick we can do stencils with our Sizzlits dies, even those with several closely spaced shapes.

You need:


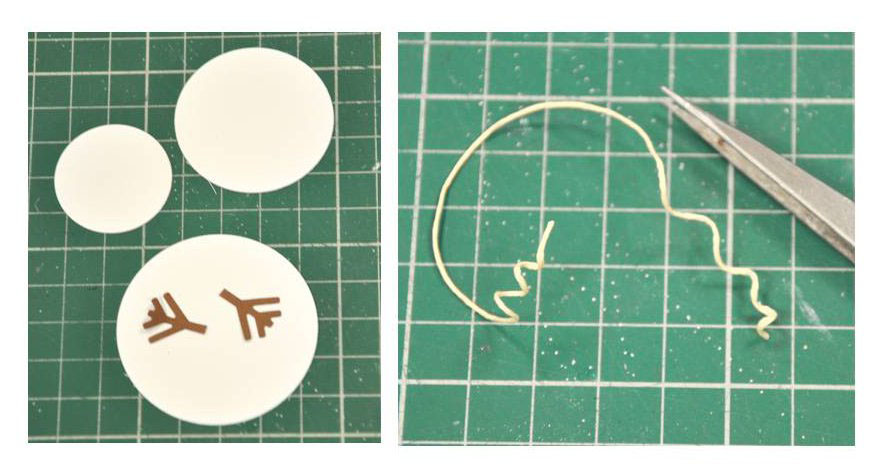
  1. Cut the piece of vinyl that we will use, considering that it should be a margin around the figure to not dirty with the paint. Place on the die, with the vinyl side down, and cut.  
  2. Cover with masking tape (in the vinyl side) all the cuts that have been around that are not the chosen figure. Remove the vinyl die from the central figure.  
  3. When we want to use the stencil, simply remove the paper protecting from the adhesive part of the vinyl and paste our stencil in the desired position. With a sponge or stiff brush loaded with little paint we tapped on the stencil, remove, and voila!


We can use the stencil several times, while the adhesive keeps sticking and small parts do not break. I used it to decorate a Christmas ornament: felt gloves with winter motives.


What do you think? Easy right? Until next week with a new tutorial!

////////////////////////////////////////////////////////////

Ciao amici!

Siamo abituati ad usare la nostra Big Shot per tagliare ogni genere di oggetti e decorazioni, e abbiamo anche imparato ad usarla per fare dei timbri di gomma crepla, ma... possiamo usare le nostre fustelle per fare degli stencil?

La risposta è si! Con un piccolo trucco possiamo fare delle mascherine con le nsotre fustelle Sizzlits, anche con quelle che hanno diverse forme molto vicine.

Materiali
Tagliare un pezzo di vinile, tenendo conto che ci deve essere un margine tutto attorno alla figura del nostro stencil per non sporcare la superficie che andremo a stampare.

Mettere il pezzetto di vinile sulla fustella, con la parte del vinile rivolta verso il basso, e tagliare. Usare il nastro per coprire tutte le parti attorno alla nostra figura che sono state tagliate dalle figure confinanti e invece non ci servono, mettendo il nastro dal lato del vinile.

Quando vogliamo usare lo stencil, semplicemente togliamo la carta protettiva e incolliamo nella posizione desiderata. Con una spugnetta o un pennello duro e poca vernice, diamo dei colpetti sullo stencil, ritiriamo, et voilà!

Gli stencil si possono usare diverse volte, finché l'adesivo incolla ancora. Io ho fatto un guanto per Natale con dei motivi invernali, che ne pensate?

Fatto! Molto semplice vero? Ci vediamo il prossimo martedì con un altro tutorial!


////////////////////////////////////////////////////////////

Hola amigos!

Estamos acostumbrados a usar nuestra Big Shot para cortar todo tipo de objetos y decoraciones, y también hemos visto cómo usarla para hacer sellos de goma eva, pero... ¿es posible usar nuestros troqueles para hacer stencil?

 La respuesta es sí! Con un pequeño truco podremos hacer stencil con nuestros troqueles Sizzlits, aun los que tienen varias formas muy juntas.

 Materiales

Cortar el trozo de vinilo que vamos a utilizar, teniendo en cuenta que debe quedar un margen alrededor de la figura para no ensuciar al pintar.

Colocarlo sobre el troquel, con el lado del vinilo hacia abajo y cortar. Cubrir con cinta de carrocero, del lado del vinilo, todos los cortes que hayan quedado alrededor que no son el de la figura elegida.
Retirar el vinilo troquelado de la figura central.

 Cuando queremos usar el stencil, simplemente quitamos el papel que protege la parte adhesiva del vinilo y pegamos nuestro stencil en la posición deseada. Con una esponja o un pincel duro cargados con poca pintura damos golpecitos sobre el stencil, retiramos, y listo!

 Podemos usar el stencil varias veces, mientras el adhesivo siga pegando y las partes pequeñas no se rompan. Yo lo he usado para decorar un adorno de Navidad, unos guantes de fieltro con motivos invernales.

¿Qué os parece? ¡Hasta la próxima!