Monday 30 June 2014

Pretty Shoes Lay Out

Hi everybody!

Today I want to share with you a little Lay out I made this weekend. Sometimes I like to make LOs about little things that make me happy, like my latest addition to my shoe collection. This pair of shoes was a completely "coup de cour", so It deserved its own page in my album.


I have used one of the dies of the Life Made Simple range. They are so versatile! I have die cut the hexagons overall pattern an I have insert some of the little hexagons in place again, so it has more interest. For this LO I wanted also a layered look, and I have used some vellum, more pattern paper and the beautiful Damask border Thinlits die to achieve it.


Lastly, I put my tittle with some adhesive letters on the sentiment tag and as my final touch I have die cut a heart out of glitter card stock.

Happy Monday!

.............................

¡Hola a todos!

Hoy quiero compartir con vosotros una página que he hecho este fin de semana. A veces me gusta hacer páginas sobre las pequeñas cosas que me hacen sonreír, como mi última adquisición en zapatos. Este par fue un auténtico "Coup de Coer", así que se merecían su propia página en mi álbum.

He utilizado uno de los troqueles de la linea Life Made Simple, que son muy versátiles. He trouqelado el patrón de hexágonos y he vuelto a poner algunos en su sitio pata darle más interés.

Para esta página quería un look a capas y he utilizado un pape vegetal, más papel decorado y el Borde Damask para lograrlo.

Por último he puesto el título con letras adhesivas en la etiqueta y como el toque final un corazón troquelado con cartulina de purpurina.

¡Feliz lunes!

Sunday 29 June 2014

A flowery and shabby mixed media layout by Bente


  Hi there Sizzix friends.

Today I have a page to share that took me quite some time to make.
I enjoyed very much the process of adding bits and pieces continously and had I not decided enough is enough, I might be adding to it still......


I used my trusted Tattered Florals  Bigz die for the pink handmade flowers and also the Frameworks Trellies dies. Lots of mixed media goodness on this page and let me tell you I had sooo much fun creating it.


I love how all these colours look together.
The background teal colour was achieved mixing two different mists with gesso.


I misted my Tattered Florals with  a dark pink colour to add some more pizazz.


That's all for now.
I hope yooy enjoyed my page and also thanks for your sweet comments on my previous post.

Sizzix Bigz Die - Tattered Florals 

Sizzix Frameworks Die - Trellis

And I used the June kit from Scraps of Elegance  containing papers from 7 Dots Studio. I also used mists and flowers from Prima Marketing, washi tape from Glitz, liquid pearls from Rangers, mini roses and stickers from Papirdesign.


Hej alla vänner av Sizzix!

Idag har jag en sida att visa som tog rätt lång tid att göra. Jag njöt mycket av processen att lägga till fler och fler detaljer, och hade jag inte sagt 'stopp' så hade jag väl fortsatt att lägga till saker ännu!...

Jag använde min pålitlige vän Tattered Florals Bigz dien till de rosa handgjorda blommorna och dessutom 'Frameworks -Trellies'. Mycket mixed media kul på denna sidan och den var otroligt kul tt jobba med!

Jag gillar skarpt hur dessa färgerna ser ut tillsammans. För den grön-turkosa färgen använde jag två olika färger på mist som jag sedan blandade med gesso.


Med mist gjorde jag också ett splattermönster på de rosa blommorna för att ge dom lite mer karaktär.

Det var allt för denna gången!
Hoppas ni gillar vad jag gjort här, och dessutom ett stort tack till er för alla fina kommentarer ni lämnade på min förra bloggpost!!

Sizzix Bigz Die - Tattered Florals 

Sizzix Frameworks Die - Trellis

 Jag använde också Scraps of Elegance kit för Juni med pappers från 7 Dots Studio.  Jag använde dessutom mist och blommor frånPrima Marketing, washi tape från Glitz, liquid pearls från Rangers, mini rosor och stickers from Papirdesign.


A birthday card by Olga


Hello all!

Today I would like to show you this bright summer card. This time I created a background using spray mists and stamps and added some watercolor splashes. 


I used a frame die for the phrase:


I used my lovely roses die as always:


The products I used here:

Sizzix Framelits Die Set 5PK - Tickets

Saturday 28 June 2014

A needlework project bag


Hi , how are you finishing June ? I have been full of work  but happy to start July and have a good rest in my summer holidays.
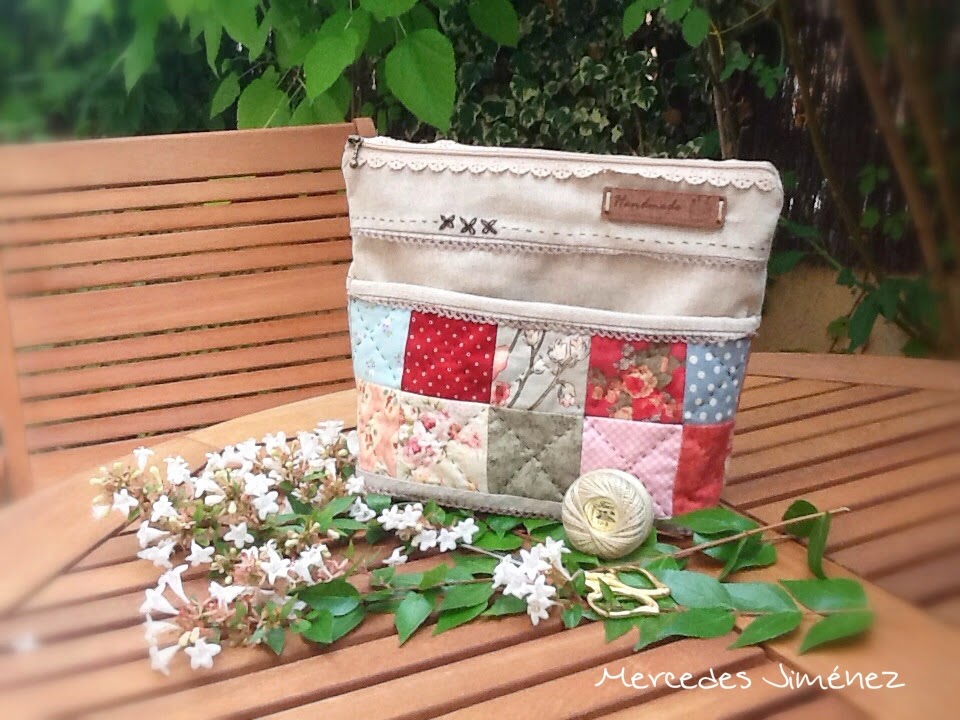
Well, today I have done a new project for Sizzix, it ´s a little bag for my wips that I want to take to my trip.
I´m sure most of you have scraps of fabric from last projects and keep them for something. This is a perfect way to use the squares die and give a new opportunity to those scraps.


Here it´s  the front.......


                                                                 .........  and back ..........


But first , we go with the supplies :


Scraps for  the squares  ( 20 )
Cotton fabric like rustic in brown- natural color :
Front of the bag
10" x 4.5"(  1 for the pocket back )
10"x 1.5 " ( 1 for the bias upper pocket )
10" x 2.5" (1 for the upper piece  )
10"x 8" (1 for the botton piece with pocket )
Back of the bag
10"x 4.1/4" (1 for the upper piece)
10"x 2. 1/4" ( 1 for the botton piece )

10" x 10.5"  Batting ( 2 Pieces )
10"x4.5" batting ( 1 piece for the pocket )

10 " x 10.5"  fabric for lining ( 2 pieces )
11.5 lace zipper 
32" bias ribbon with lace 
DMC brown thread 
Wooden label ( if you like )


This time I have taken a bunch of pics so you can find the step by step easily. 


Sew  four strips of  five squares , and sew together two  and another two of them.
Now you have got 2 blocks.
Take one of them and do a sandwich with batting and backing fabric.
Quilt by hand with embroidery  brown thread.


Add a bias ribbon like the pic and finish by hand with hidden stitches. This is the upper pocket.
Sew the brown fabrics  with other bias ribbon.
                                             Lay the quilting piece ( pocket ) on that brown fabric and put another piece of bias ribbon and sew with your  machine. Finish again by hand.
Do some decorative stitches with embroidered  brown thread.
Add a new batting piece to this front of the bag
Now you have the front finished.


 Now ,sew the other piece of  quilted piece with rectangles brown fabrics . Do a sandwich like before, quilt and sew decorative stitches. Now you have the back of the bag ( upper pic )


It´s  time to sew the lace zipper. You must to sew the the two pieces of lining to  back and front of the bag, laying the right side together.
Sew the zipper following these steps , sew around  letting something  open   and do the corners, bag and lining and trim the excess.

Take out  and sew the opening of the lining .


And , finally  add something more decorative  label if you want . Mine is made of wood.
I hope you enjoy this tutorial and maybe you can take your wips like me in your summer holidays. 

Hope you have a wonderful weekend

Love
Mercedes


...........................................*************............................................


Hola ! ¿ Qué tal estais terminando junio ? Yo he estado a tope de trabajo pero feliz de poder empezar Julio y disfrutar de mis vacaciones de verano tan merecidas.
Hoy os traigo un nuevo proyecto para Sizzix , una pequeña bolsa para guardar  los trabajos en marcha de labores y que quiero llevar de vacaciones.
Estoy segura que muchas de vosotras tenéis restos de telas que os han sobrado de otras tareas y que guardais para futuras ideas. Pues esto es perfecto para  usarlos con el troquel de cuadrados y dar una nueva oportunidad a esas telitas.

Echad un vistazo a la parte delantera ( primera foto) y la trasera ( foto siguiente ) .
Materiales :


Restos de telas para los cuadrados ( 20 )
Tela de algodón rústica en color marrón natural :

Para la parte delantera

25cm x 11cm ( 1 para la trasrea del bolsillo )
25cm x 4 cm ( 1 para hacer el biés de la parte superior del bolsillo )
25 cm x 6 cm ( 1  para la parte superior)
25cm x 20 cm ( 1 para la parte inferior con el bolsillo )

Para la parte trasera


25cm x 11cm (1 para la parte superior )
25cm x 5.5 cm ( 1 para la parte inferior )

25cm x 26.5 cm de guata ( 2 piezas )
25cm x 11.5 cm de guata ( para el bolsillo )
25cm x 26.5 cm de tela para  el forro  ( 2 piezas )
Cremallera de puntilla  de 29cm
81cm de bies  con adorno  para los ribetes
Hilo DMC en marrón oscuro
Etiqueta de madera si quieres.


Esta vez he tomado bastantes fotos para que te resulte sencillo seguir el tutorial , asi que de nuevo echa un vistazo.

Una vez cortados los cuadrados ( 20) hice cuatro tiras con 5 de ellos y las cosí dos y dos. Luego hice un sandwich con la trasera del bolsillo , la guata y una pieza de los 5x 2 cuadrados. Acolché a mano con una hebra de hilo de bordar.
Añadí un biés con puntilla  a la parte superior y cosí con  un poco de la tela rústica  para rematarlo por el revés a mano con puntada escondida.
Cosí  las dos telas ( la de 6 cm y  20cm por 25cm )  con otro trozo de biés  con puntilla .Coloqué el bolsillo acabado encima  y puse otra vez bies con puntilla en la parte inferior del bolsillo. Cosí  a máquina y rematé a mano.
Mira las cuatro fotos juntas y te darán la pista.
Tomé la otra parte de los cuadrados y cosí a máquina los dos trozos de tela rústica ,parte superior e inferior. Coloqué la guata y acolché.
Hice un bordado decorativo en la parte delantera y trasera de la bolsa.

Para coser la cremallera mira el proceso en el grupo de fotos.
Coloqué cada  parte del forro sobre  cada  parte de la bolsa , derecho con derecho y cosí solo el lado superior donde iría la cremallera. Dí la vuelta y planché dejando revés con revés cada una.
Coloqué un lado de la cremallera   sobre la parte delantera  cosí y luego  hice lo mismo con la trasera  de la bolsa.
Volví  un lado del derecho de la bolsa con el otro  , de modo que se quedó la guata a la vista. Junté el forro en el otro lado , también revés con revés.
Cosí todo alrededor dejando una pequela abertura para dar la vuelta luego.
Maté las esquinas  a 2.5 cm del pico y cosí. Corté el exceso del pico , di la vuelta , saqué el forro y cerré por el derecho con la máquina haciendo una puntada lo más cercana al borde.

Por ultimo añadí la etiqueta de madera.
Espero que disfrutes este tutorial  y quizá te sirva como a mí para llevar tus trabajos en curso para tus vacaciones estivales.


Puedes volver a él las veces que quieras para  aclarar dudas del montaje y hacer tu propia versión. 
Me encantaría ver vuestros resultados .Sólo tienes que comunicarlo en mi blog 

Que tengas un maravilloso fin de semana
Cariños 
Mercedes

Friday 27 June 2014

Pop 'n Cuts Butterfly & Hearts Card


Hello! It's Anna here to share some ideas using Sizzix products.
Today I have a card to show you. I have used some Sizzix Dies on this project.
I love my Sizzix Thinlits Die Set 3PK – Love of “Life Made Simple” collection. Put this die together with the Pop’N Cuts Card Base Big Shot Die and you end up with a unique card.
I gave this card to my friend for her birthday.
Here is the finished card:
 
cafe creativo - big shot sizzix - card pop up - Pop 'n Cuts (1)
 
To make the front card I die-cut hearts background out of light pink cardstock and I play with the small hearts.
 
cafe creativo - big shot sizzix - card pop up - Pop 'n Cuts (2)
 
Let's look at the card's inside:
 
cafe creativo - big shot sizzix - card pop up - Pop 'n Cuts (3)
 
To make the inside I die-cut two butterflies (from Bigz die of Starter Kit), a rose 3D and a label. Use embossing folders to create a textured background on the butterflies.
 
cafe creativo - big shot sizzix - card pop up - Pop 'n Cuts (4)
 
cafe creativo - big shot sizzix - card pop up - Pop 'n Cuts (5)
 
This is such a cool card!
Until next time
 
Items used:
 
 
cardstock
patterned paper
cardboard
vellum paper
flower
strass
bead
foam board tape
 
**************************************
Flag_of_Italy
Per le amiche italiane! :)

Ciao, sono Anna e sono qui per condividere alcune idee utilizzando i prodotti Sizzix.
Devo dire che mi piace molto la collezione di fustelle “Life Made Simple”. Se metti insieme lo sfondo a cuoricini con con una fustella Pop'n Cuts, si arriva sicuramente a produrre qualcosa di unico.
E siccome dovevo fare una card per il quarantesimo compleanno di un'amica, ho cercato un'idea speciale per fare gli auguri... e spero di esserci riuscita ;)
Per fare il fronte del biglietto ho fustellato lo sfondo a cuori dal cartoncino rosa chiaro ed ho poi giocato un po' con i cuoricini di diversi colori, che ho messo qua e là. Lo sfondo l'ho incollato sulla base card fucsia, completando il tutto con un fiorellino.
L'interno della card Pop'n Cuts l'ho decorato con due farfalle (usando la Bigz dello Starter Kit), una rosellina 3D e un'etichetta tagliata su carta da lucido. Le farfalle le ho anche embossate con mascherine differenti, per dare più rilievo, visto che la carta fantasia che ho scelto è molto decorata e scura. Strass e perle hanno dato il tocco finale, per illuminare anche un po'.

Spero che la card vi sia piaciuta.
Alla prossima!
 
Materiali:
 
 
cartoncini
carta fantasia
cartone
carta da lucido
fiore
strass
perlina
biadesivo spessorato


Thursday 26 June 2014

Adopted blocks part 1


Well hello again - I hope you've been able to enjoy some beautiful sunshine - although today the sun is hiding behind the clouds at the moment - I still have hope of seeing it later!
I am pleased to say that I have completed 'Katy's' quilt and really like it - so here are the instructions for some of the blocks - I will give fabric quantities for each block.
The following Bigz dies are used throughout this quilt, with the Big Shot machine -
I am trying to keep the instructions simple - so use the photo of each block as a guide throughout.
We will start with
 Block 1 Crockett Cabin -

For this block you need to use the square and half square triangle dies.
You need white fabric - 8" x 12" - use die 657606 to cut 4 squares and die 657610 to cut 4 half square triangles.
Blue print and pink print - 8" square of each - cut 4 squares from each fabric with 657606
Green print - 4" x 8" - use die 4" x 8" 657610 to cut 4 triangles.
Join the green triangles to white triangles to create 4 squares,.
Join 2 pink and 2 white squares together to make a 4 square block, repeat once.
Join 2 blue squares and 2 green/white squares together to make a block, repeat once.
Using the photo as a guide join the 4 squares together to complete the block.

Block 2 - Patchwork Pinwheel
White fabric - 8" x 16" - cut 8  half square triangles and 4 squares
Pink fabric and peach fabric - 4" x 8"of each - cut 4 half square triangles of each
Blue print 8" square - cut 4 squares
Join peach and pink triangles to white triangles to make squares.
Join the pink/white squares to a white square and the peach/white squares to a blue square - using the photo as a guide.
Join these rectangles together to make 4 squares and then join the squares together to make the complete block.

Block 3 - Chevron

You need 16"square of white fabric - from which you need to cut 16 half square triangles.
Pink and blue print fabrics - 16" x 8" of each to cut 8 half square triangles of each.
Join the white triangles to the pink, and blue triangles to make squares.
Lay the square out to create the chevron pattern and join together in rows, and then join the rows.
Block 4 - Railroad crossing
White print - 16" x 12" and cut 6 half square triangles and 6 squares.
Aqua print - 12" x 8" cut 6 half square triangles
Pink spot print - 8" square - cut 4  squares.
Join the triangles together to make 6 squares.
Join the pieced squares to 2 white squares to create larger squares.
Join the pink squares to the remaining white squares and join to make 2 larger squares.
Join these 4 squares together.

Block 5 - Susannah
White fabric - 16" x 8" - cut 4 half square triangles and 4 rectangles.
Pink, orange floral, orange spot and blue prints - 6" x 3 1/2" of each - cut 1 trapezoid from each fabric.
Join a triangle to the end of each trapezoid to create a rectangle.
Join a white rectangle to each pieced rectangle to make a square.
Join the 4 squares together.

Block 6 Squares in squares.

White fabric - 10" x 7" cut 2 squares and 2 rectangles
Pink and black print - 14" x 7" - cut 2 rectangles and 4 squares
Pale pink print - 7" x 3 1/2" cut 2 squares,
Join a pink and white rectangle together on short side, repeat once.
Join a pink and black square to a pale pink square, add a pink and black and then a white square. Repeat once.
Join the rows together to complete the block.

Block 7 Half square triangle study
White fabric 16" square - cut 16 half square triangles
8 different prints - 4" square - cut 2 half square triangles from each.
Join the white and print triangles together.
Lay the squares out and then join together into 4 rows of 4.
Join the rows together to complete.
Wow -we're now 1/3rd of the way through the blocks - so look in again next week for the next set.
Also for those of you who remember my plan to re-organise my sewing room - a brief update - I sorted and tidied until I could see, and hoover the floor!! I have removed a large trestle table that I think I can manage without. The next stage is to put my quilting frame together - I'm just hoping I can remember how to do it - and then I will be able to cut lots of fabric to make some quick quilts so that I can practise my quilting.
It's a plan which I hope to achieve and if I do I'll share a couple of photos!
Meanwhile I'm off the hunt for some sun while I have a cuppa.
Before I forget - just a reminder that the Festival of Quilts is only 6 weeks away - cheer or scream -depending on how much you have to do before you get there!!!
Angela