Sunday 31 March 2013

Special Gift by Gerry


Hello Sizzix friends!
Happy Easter from my family to yours!
Today I have for you a little gift I made for somebody special.
I used the Pocket Watch Frame Die as a base and 
I hope you will like it and get inspired.
655268 Sizzix Big Shot machine
658571 Sizzix Movers & Shapers Bigz Die - Pocket Watch Frame
658356 Sizzix Embossing Folders - Rose Vines & Trellis Set
658701 Sizzix Framelits Die Set w/stamps- Word Labels
656938 Sizzix Movers & Shapers Bigz L Die - Tag & Bookplates


This is what I did:
1. I used peel cardboard 1.5 mm ( or you can use corrugated cardboard)
 to make your project stable and pattern paper of your choice. 
Both were die cut together....

2. As a result I had both inside circles almost cut.
I used a craft knife to cut them completely and separate them from the frame.

3. After that I die cut once again the Pocket Watch Frame but
this time using another pattern paper and I gave texture with 
the gorgeous Trellis embossing folder .
Then carefully sanded the embossed trellis.
N.B. If you use only pattern paper you don't 
get the "pre-cut" circle!

4. Now I have all three parts of my base and they are
ready to be adhered in the order as shown on the photo below....
Once everything is adhered you can sand the frame and
add e.g. Glossy Accents.

5. I die cut the oval Bookplate and used only the oval itself 
so I can stamp my quote.
N.B. I tried to use not too much ink so when I stamp it
it would look more vintage.
Now you can decorate with embellishments
of your choice!
OTHER PRODUCTS I USED:
Webster's Pages pattern paper
Webster's Pages bird resin 


Dutch Translation

Hallo Sizzix vrienden!
Vrolijk Pasen allemaal.
Vandaag laat ik een geschenk zien dat ik voor een bijzonder iemand heb gemaakt. 
Ik heb het Pocket Watch Frame Die als een basis gebruikt. 
Ik hoop dat jullie geïnspireerd  raken!

655268 Sizzix Big Shot machine
658571 Sizzix Movers & Shapers Bigz Die - Pocket Watch Frame
658356 Sizzix Embossing Folders - Rose Vines & Trellis Set
658701 Sizzix Framelits Die Set w/stamps- Word Labels
656938 Sizzix Movers & Shapers Bigz L Die - Tag & Bookplates


*  *  *
Dit is wat ik gedaan heb:
1. Ik heb pelkarton 1,5 mm (golfkarton mag ook) gebuikt om het project stabiel te maken, samen met patroonpapier dat je naar eigen keuze kan uitzoeken. Beiden zijn samen gestanst...

*  *  *
2. Het resultaat is dat de 2 binnenste cirkels bijna geheel uitgesneden zijn
Met een hobby mes heb ik ze helemaal uitgesneden en van het frame losgemaakt.
*  *  *
3. Daarna heb zakhorloge frame nog een keer gestanst, maar deze keer met patroonpapier. 
Vervolgens heb ik het ge-embossed met de prachtige Trellis embossing folder  
Met schuurpapier heb ik het reliëf bewerkt.
*  *  *
4. Nu heb ik alle 3 delen van mijn basis en zijn ze klaar om vastgemaakt te worden zoals getoond is op de foto. Zodra alles vastzit kun je het frame schuren en bijvoorbeeld de Glossy Accents toevoegen
*  *  *
5. Ik heb de ovale Bookplate gestanst en alleen het ovaal zelf gebruikt zodat ik mijn quote kan stempelen.

P.S. Ik heb geprobeerd om niet teveel inkt te gebruiken bij het stempelen zodat het er meer "vintage" uitziet. Nu kun je alles decoreren met de embellishments van je eigen keuze
*  *  *


Have a great day!

Enjoy by Camilla Ekman


Happy Easter everybody!

I have made a card for my blog post today. It is made for that Easter egg you are giving away. I have used some different Sizzix dies together with papers from Maja Design.


These cool stars are new. This is what they look like when cut:


A close-up. You see that there are lines made where you are supposed to fold.


This is what it looks like when folded. 


I also cut a tag for my Easter picture.


And a doily.


And the tattered banners are perfect for the title.


See you next week!

Camilla

*************************************

Glad påsk till er alla!

Jag har gjort ett kort till mitt blogginlägg idag. Kortet är ett komplement till det där påskägget du kanske ska ge bort. Jag har använt några olika Sizzix dies tillsammans med papper från Maja Design.

De coola stjärnorna är nya. På bilderna ser du hur de ser ut när de är utskurna. Det blir skårade linjer där du ska vika för att få en tredimensionell stjärna. Jag har också skurit ut en tag som bakgrund för min påskbild. En doily att ha bakom tagen. En utav tattered banners är perfekt att använda till korttiteln.

Dessa Sizzixprodukter har jag använt:


Vi ses nästa vecka!

Camilla

Saturday 30 March 2013

Easter Bonnet


I can hardly wait for spring to get here!

Lately I have been really having fun with my 3D flower dies using unexpected materials. See my post on the Sizzix US blog showing how to make a bouquet of coffee filter flowers. You can also see a video of how I created them in my personal blog post here.

There are so many cool things you can make with flowers including home decor items, hair accessories, shoe clips, pins and earrings, napkin rings, embellishments for layouts and cards, and even on clothing.


I decided to make an Easter bonnet- I don't know if that is or ever was a tradition where you live, but I remember as a kid getting all dressed up for Easter and that definitely included a hat. I found this nice felt one for $4 in a thrift shop.

Supplies:

657119  Sizzix Bigz Die - Leaves
657114  Sizzix Bigz Die - Flower Layers #9
657721  Sizzix Bigz Die - Borders & Hydrangeas
657115  Sizzix Bigz Die - Flower, 3-D Fringed
657118  Sizzix Bigz Die - Flowers, 3-D #2

658053  Sizzix Bigz Die - Flower Layers w/Heart Petals


glue gun, ribbon, hat, brads, materials to cut

  1. Die cut flowers and leaves from different materials including paper bag, sewing pattern, coffee filters, crepe paper, cardstock, tissue paper, netting, watercolor paper and fabric in coordinating colors.
  2. Combine parts from different dies and assemble, creating custom flowers. Color flowers using inks, stamps, paint, mists, pastels, and markers. Assemble with brads 
  3. Run a ribbon around the crown of the hat and glue into position.
  4. Place into position on the hat and use glue gun to adhere flowers when your arrangement is just right.
Best wishes for a Happy Easter!  

Friday 29 March 2013

Spring Cards: Two little birdies


Hi everyone! 
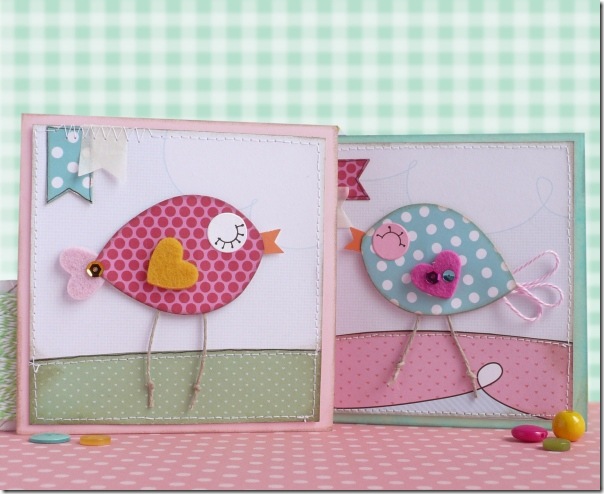
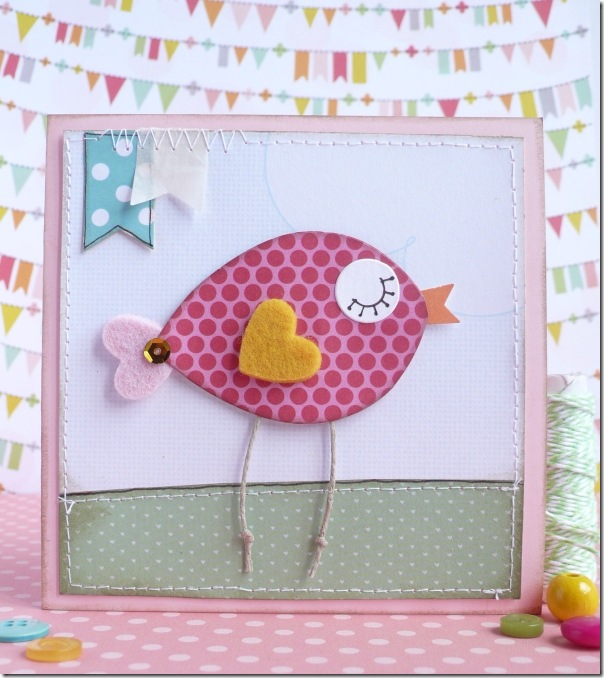
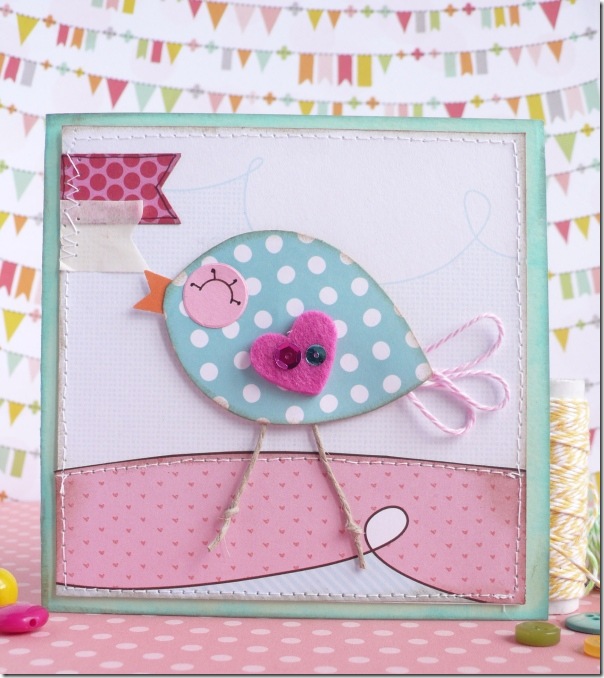
Today I wanted to show you card designs that are really quick and easy to make for Easter/Spring.
To make the card a set, I like to stick the same basic design and give each card a twist of its own.


Anna Drai - big shot - card - easter - pasqua - tutorial (1)

Items used:
Sizzix Big shot machine (655268)
Sizzix Framelits Die Set 8PK - Squares (657565)
Sizzix Framelits Die Set 6PK w/Stamps – Banners (658289)
Sizzix Bigz Die - Leaves (657119)
Sizzix Bigz Die - Owl #2 (657694)
Sizzix Originals Die - Circles #4 (657020)
cardstock: pink, white, orange
patterned papers
felt
twine
distress ink
sequins
two-sided tape, glue...
yarn
sewing machine

How to make:


1- Fold a piece of pink cardstock in half to create a square card base approx  10,5 cm.
2- Use the second square of Framelits die to cut a square from cloud paper. Distress ink the edges. Glue to the front of the card.
3- Cut out two little banners, then layer together.
4- Adhere a stripe of spotty green paper to the below side of the card. Distress ink the edges. Sew around with white yarn.
5- Cut out a big leaf from spotty pink paper. Remove the leaf-stalk. Cut out a little white circle, design the eye and glue in the body of bird. 
6- Cut a little banner from orange paper and cut with a scissor to make a beak.
7- Cut out two little heart from felt, one to make a wing, one to make the tail. 
8- Cut a piece of twine and tie the ends. Fold the twine and glue behind the body to make the legged bird.
9- Adhere the bird with a two-sided tape. Accent with sequin to finish.


Now you’ll have a sweet little birdie card all ready to send off to a friend!
Thanks for stopping by to my quick little post.
Happy Easter!


Anna Drai - big shot - card - easter - pasqua - tutorial (2)

Anna Drai - big shot - card - easter - pasqua - tutorial (3)

**************************************
Flag_of_Italy Per le amiche italiane! :)


Ciao a tutti!
Oggi vorrei mostrarvi un paio di card adatte per questo periodo di Pasqua / primavera. Sono veramente veloci e facili da fare, quindi ne potete realizzare diverse, magari come inviti per una festa di bambini. Per altro usando le fustelle Originals o Bigz potete tagliare diversi strati in una volta sola per velocizzare il lavoro! ;)
Per fare un set di card, mi piace mantenere lo stesso modello di base e dare ad ogni biglietto un tocco personale, così ho realizzato due card simili, ma non uguali!


Non sono carini questi uccellini?
Vi spiego come fare...


Materiali:

Sizzix Big shot machine (655268)
Sizzix Framelits Die Set 8PK - Squares (657565)
Sizzix Framelits Die Set 6PK w/Stamps – Banners (658289)
Sizzix Bigz Die - Leaves (657119)
Sizzix Bigz Die - Owl #2 (657694)
Sizzix Originals Die - Circles #4 (657020) cartoncino: rosa, bianco, arancione
carte fantasia: rosa, verde, celeste/nuvole
piccoli ritagli di feltro, colori in tono
spago
inchiostro distress
pennarello nero
paillettes
biadesivo spessorato, colla ...
opzionale: macchina da cucire, filo

Come fare:


1 - Piegare a metà un pezzo di cartoncino rosa per creare un quadrato di circa 10,5 cm per lato.
2 - Tagliare un quadrato con i Framelits usando una carta fantasia con nuvole. Sporcare con inchiostro i bordi. Incollare sul fronte del biglietto.
3 - Tagliare due bandierine, quindi sovrapporle e incollarle in alto.
4 - Tagliare una striscia di carta a pois verde per creare il prato, sporcare con inchiostro i bordi e incollarla in basso. Cucire tutt'intorno con filo bianco, se si vuole.
5 - Tagliare una foglia grande dalla carta rosa a pois. Con le forbici tagliare via il gambo per fare il corpo dell'uccellino. Tagliare un cerchietto bianco, disegnare l'occhio e incollare sul corpo.
6 - Tagliare una bandierina arancione, rifilarla con la forbice per fare il becco ed incollare.
7 - Tagliare due cuoricini dal feltro, uno per fare un'ala, l'altro per fare la coda ed incollare.
8 - Tagliare un pezzo di spago e fare i nodi all'estremità. Piegare lo spago a metà e incollare dietro il corpo per fare le zampe dell'uccellino.
9 - Incollare l'uccellino alla card con un biadesivo spessorato. Abbellire con paillettes.


Ecco che avrete un dolce uccellino da spedire ad un'amica!
Grazie per essere passate di qui :)
Buona Pasqua!

Thursday 28 March 2013

Flowers a plenty


As promised last week I've been playing with flowers.
I used this die last week at Sewing for Pleasure and I liked it so much I decided to incorporate it into our sample quilt. It was a pleasure to meet so many of you at the show - especially because of the weather - and to see some of your work and talk about our shared passion for sewing.  
The bigz die I used is 657690 - Flower Layer and Leaves.
 
To create variety I chose 4 fabrics for the flowers and White fabric for the background.
I cut the white fabric for the background slightly larger ( 9 1/2" square ) to allow for any fraying while handling and will trim them to size when I've finished them )
I bonded a fusible web onto the wrong side of the fabrics ( 5 1/2" squares), andd put all 4 fabrics on the die and rolled them throught the Big Shot and you can see, in the picture above, the variety of shapes created.
As there would be too many pieces to fit on one block I decided to make 2 blocks - one will be machine appliqued and the other will be stitched by hand.

The photo below shows the flowers and leaves layered and pressed in place on the backing, and

.
 
then  machine appliqued - using a narrow, close zig-zag stitch
This is the set that I sewed by hand - using blanket stitch


I thoroughly enjoyed the hand stitching on this block - so I think there may be another hand stitched applique block later in the blog.
All I'm going to say about the weather this week is that the sun is shining at the moment!
So enjoy Easter, whether you're inside sewing or outside in the garden.
Have fun.
Angela


Mini album with washi tape binding by Janna Werner.


Hello everyone, this is Janna.
Today I´d like to share a mini album that I created for my upcoming 4-day-journey to Oslo. I am going to take it along on the trip and will use it as a smash book.


Material list:
655268 Sizzix Big Shot machine
657691 Sizzix Bigz Die - Heart, Stem & Leaves
657495 Sizzix On The Edge Die - Butterflight
656938 Sizzix Movers & Shapers L Die - Tag & Bookplates
658284 Sizzix Textured Impressions - Chevrons & Flourishes
patterned paper: Dear Lizzy, Crate Paper, Studio Calico
rhinestones, doily, twine, crepe paper, petals: Stampin´ Up
washi tape: Tim Holtz
alpha sticker: American Crafts, Dear Lizzy
other: sewing machine, white thread


I gathered paper scraps in different sizes and arranged them on top of each other. To create a fluffy appearance mix large and small pieces. I only used happy, springlike colors such as pink, yellow, turquoise...


There are many ways of binding a mini album, but why choosing the most difficult binding, when an easy one is as effective?! I love the look of the washi tape binding.


The tag was cut with the Movers & Shapers Die - Tag & Bookplates - one of my favorite dies. The butterflies were cut with the On The Edge Die - Butterflight, the heart with the Bigz Die - Heart, Stem & Leaves. As you can see, I used the heart die on crepe paper. Love the way it turned out.


If you have a closer look at the top and bottom part of the first paper you´ll notice a decent chevron pattern. I used the Textured Impressions - Chevrons & Flourishes embossing folder, but instead of running the paper through the Big Shot machine, I placed the paper in the folder and pressed with my hands.

Thanks for stopping by today. Have a great and crafty day, everyone!
Janna

*****

Hallo ihr Lieben, hier ist Janna.
Heute möchte ich euch ein Mini-Album zeigen, das ich für meinen kommenden 4-Tage-Urlaub nach Oslo hergestellt habe. Ich werde das Album mitnehmen und wie ein Smash Book verwenden.
 
Materialliste:
655268 Sizzix Big Shot machine
657691 Sizzix Bigz Die - Heart, Stem & Leaves
657495 Sizzix On The Edge Die - Butterflight
656938 Sizzix Movers & Shapers L Die - Tag & Bookplates
658284 Sizzix Textured Impressions - Chevrons & Flourishes
Patterned Paper: Dear Lizzy, Crate Paper, Studio Calico
Rhinestones, Doily, Twine, Krepppapier, Blütenblätter: Stampin´ Up
Washi Tape: Tim Holtz
Alphas: American Crafts, Dear Lizzy
Anderes: Nähmaschine, weißes Garn

Ich habe Papiere in verschiedenen Größen zusammengesucht und sie aufeinander arrangiert. Um einen lockeren Look zu erhalten, sollten kleine und große Papiere gemischt werden. Ich habe nur fröhliche, frühlingshafte Farben genutzt, wie Gelb, Pink und Türkis.

Es gibt viele Arten, ein Mini-Album zu binden, aber warum kompliziert, wenn es auch einfach - und ebenso effektiv - geht?! Mir gefällt die WashiTape-Bindung sehr gut.

Den Tag habe ich mit der Movers & Shapers Die - Tag & Bookplates zurechgeschnitten - eine meiner Lieblings-Dies. Die Schmetterlinge sind mit der On The Edge Die - Butterflight gestanzt worden und das Herz mit der Bigz Die - Heart, Stem & Leaves. Wie ihr sehen könnt, habe ich das Herz aus Krepppapier gestanzt, sieht wunderschön aus.

Wenn ihr genau hinkuckt seht ihr, dass im oberen und unteren Bereich des ersten Papiers ein dezentes Chevron-Muster aufgetragen ist. Das habe ich mit dem Textured Impressions - Chevrons & Flourishes embossing folder erreicht. Anstatt das Papier mit dem embossing folder durch die Big Shot Maschine zu drehen,  habe ich das Papier in den folder gelegt und mit den Händen zugedrückt.

Habt einen schönen Tag!
Janna  


Happy Birthday !


Hello!


After a long series of mini album, I am back with a layout starring my friend Celine, who I’m sure all of you know!

Here are the dies I used:

655268 Big Shot
659068 Sizzix Thinlits die-Doily
658556 Sizzix Bigz die-fleur de Lis & Eiffel Tower

Supply list:

Papers: I Lowe Scrap, American Crafts
Alphabets: American Crafts
Embellishments: Pink Paisley, American Crafts
Stamps: Florilèges Design, Paper Artsy, 7Gypsies
Inks: Archival Viridian, Madden Rose
Distress Stain
Adirondack Clover ink


I started by cutting a pretty doily out of white paper. This die is so neat and feminine, I love it!

I didn’t want to hide the die so I glued a very small photo astride it.


I also cut an Eiffel Tower shape out of white paper then I stamped text on it with a Florilèges design stamp. I outlined its edges so that it stands out more.

This layout "Happy 32"  is simply built around these two dies, with soft pastel colours.

The background is stamped with various patterns and ink colours. I shaded the edges of the page with green Adirondack ink.

An easy layout with a linear design for a dear friend! I hope you liked it!

See you next Thursday!

Karine


Bonjour !


Après cette longue série de mini retour aux pages avec cette fois une création sur mon amie Céline que vous connaissez toutes !

Voici les dies utilisés :

655268 Big Shot
659068 Sizzix Thinlits die-Doily
658556 Sizzix Bigz die-fleur de Lis & Eiffel Tower


Matériel :

Papiers : I Lowe Scrap, American Crafts
Alphabets : American Crafts
Embellissements : Pink Paislee, American Crafts
Tampons : Florilèges Design, Paper Artsy, 7Gypsies
Encres : Archival Viridian, Madden Rose
Distress Stain
Encre Adirondack Clover


Je me suis tout d'abord amusée à découper un joli napperon dans du papier blanc, une découpe vraiment fine et si féminine j'en raffole !

Afin de bien voir ma découpe j'ai utilisé une mini photo que j'ai collé à cheval.


Un die Tour Eiffel est également découpé en blanc, il est ensuite tamponné à l'aide d'un tampon textes Florilèges. J'ai simplement souligné l'extérieur afin qu'elle ressorte le plus possible.


Ma page "Happy 32" est simplement construite autour de mes deux découpes en gardant des couleurs très douces et pastels.


Le fond est ensuite tamponné avec plusieurs motifs et encres, les bords de pages sont quant à eux ombrés à l'encre Adirondack verte.


Une page toute simple construite en ligne pour une amie très chère ! J'espère qu'elle vous aura plu !


A jeudi prochain !


Karine

Wednesday 27 March 2013

Simply Easter!


Notice how I resisted using any terrible Easter puns in the title. Nothing about our egg-citing new die ranges or how egg-static I am to be working with the latest Stephanie Barnard collection!

I am, however enjoying working with the aforementioned range, especially the flip-its card dies, the Easter themed stamp/Framelits sets and the Easter egg Framelits dies, check out the website and run a search under the name Stephanie Barnard...Clever lady!

Check out some of the eggs-amples below....DOH!


Smash book


Hi al!

Today I would like to show you two-page layouts to my smash book. Last year we had trip to Antalya. And these pages are about the Beach and the Sea. In my smash book I like to create a lot of layers. I used different papers, decorative tapes, journaling cards, stickers and etc to create a lot of layers. And dies are my big helpers.

This is my first two-page layout. It’s about the Beach. I created these pages some time ago.

Items used:

I used hearts die to create my background more interesting. And I used the resulting holes to write my journaling. Also I used Make It Crafty digi stamp to create this beach umbrella. I colored it with Prismacolor pencils, cut out and glue onto layout. 

I used Card Fronts die to create the opening element. I like to use different opening elements to fit on the page many photos.


This is my second two-page layout. It’s about the Sea. And these pages are new.

Items used:
Big Shot Machine (655268)


I used Flourish die – because they are look like waves. And I used more different dies to make my pages more varied.


Have a nice day

Daria.

Всем привет!

Сегодня я хочу показать вам два разворота в мой смешбук. Прошлым летом мы ездили в Анталию и об этой поездке я создаю свой смеш. Два разворота, которые я хочу сегодня показать рассказывают о море и пляже.
Я люблю, чтобы в моем смеше было много разных слоев, открывающихся элементов и т.д. Для этого я использую различные бумажки, декоративный скотч, наклейки, и конечно вырубки, сделанные с помощью Big Shot.

Первый разворот о пляже. Я сделала его некоторое время назад.

Я использовала нож с сердечками, и использовала не сами сердца, а то, что осталось после их вырезания. Мне кажется получилось интересно, плюс можно в отверстиях написать журналинг. Так же я использовала нож для создания открыток с фигурными краями. С его помощью я сделала открывающийся элемент для размещения дополнительных фотографий и журналинга.

Второй разворот о море. И это новый разворот.
Я использовала нож с завитками, т.к. завитки ассоциируются у меня с волнами, и другие ножи (список ниже), чтобы сделать странички более разнообразными.

Материалы:
Big Shot Machine (655268)


Всем хорошего дня!